Switching Email Providers Without Losing Customers
You changed the email tool in your app because the old one was annoying, expensive, or didn’t work with your no-code or AI-assisted setup.
The dashboard said “domain verified.” Your app started sending. You closed the tab.
Then a customer writes: “I tried to reset my password three times. Nothing arrived.” Another says the invoice went to spam. A third signs up, never clicks the confirmation link, and is gone.
The app is technically sending. Inboxes just don’t trust the new sender yet. The fix is moving your DNS records in the right order, not trying another provider.
(If you’re the one who owns DNS and deployments and want the version with header inspection and rollback steps, that’s the operator checklist instead. This one is written for the founder doing the switch themselves.)
Three words you’ll see on the setup screen
- SPF: a list that says “these services are allowed to send email for my domain.”
- DKIM: a digital signature that says “this email really came from my domain and wasn’t changed on the way.”
- DMARC: the rule that says “if an email pretends to be from my domain but fails those checks, what should inboxes do with it?”
You don’t need to become an email expert. You need to add the new provider without deleting the records your old one still needs.
The unsafe way most founders switch
- Open the new email provider.
- It gives you DNS records to add.
- Delete the old SPF and DKIM records because they “look old.”
- Paste the new ones.
- Switch the app to the new API key.
- Send one test email to yourself, call it done.
That can break real customer email, because your old provider is probably still sending password resets, invoices, or trial reminders from some other part of your app. Pull its authorization too early and those emails start failing trust checks, landing in spam, or getting rejected outright.
The safe migration plan
Step 1: List every place your app sends email
Before touching DNS, write down every system that sends from your domain. For a small SaaS, that’s usually:
- your app backend: signup, login links, password resets
- billing: invoices, receipts, failed payment reminders
- support: replies to customer tickets
- newsletter or product updates
- old automation tools you forgot you connected
If you built the app with AI help and don’t remember every integration, search your code or project settings for SMTP, EMAIL, MAIL, FROM_EMAIL, or the name of any email tool: anything sending as you@example.com or hello@example.com.
Step 2: Don’t delete the old SPF entry yet
Your SPF record is one TXT record at your root domain, usually shown as @ in DNS panels. It looks something like:
v=spf1 include:old-email-service.example ~allA domain should only have one SPF record: the standard says a second one makes the check fail outright instead of picking either record. When the new provider gives you its own include: value, add it to the existing line instead of creating a second record:
v=spf1 include:old-email-service.example include:new-email-service.example ~allKeep both during the migration. Remove the old one only once you’re sure nothing sends through the old provider anymore.
The exact include: value has to come from your provider’s own setup screen. Don’t copy the example above literally; it won’t work for your provider.
Step 3: Add the new DKIM records exactly as shown
DKIM records are usually TXT or CNAME entries under a name like selector._domainkey.example.com. Your provider gives you the exact host and value. Copy them exactly, including the selector name.
Don’t “clean up” old DKIM records during the switch. They don’t hurt anything sitting there, and deleting them too early can break mail still signed by the old provider, including anything the old provider queued and hasn’t sent yet.
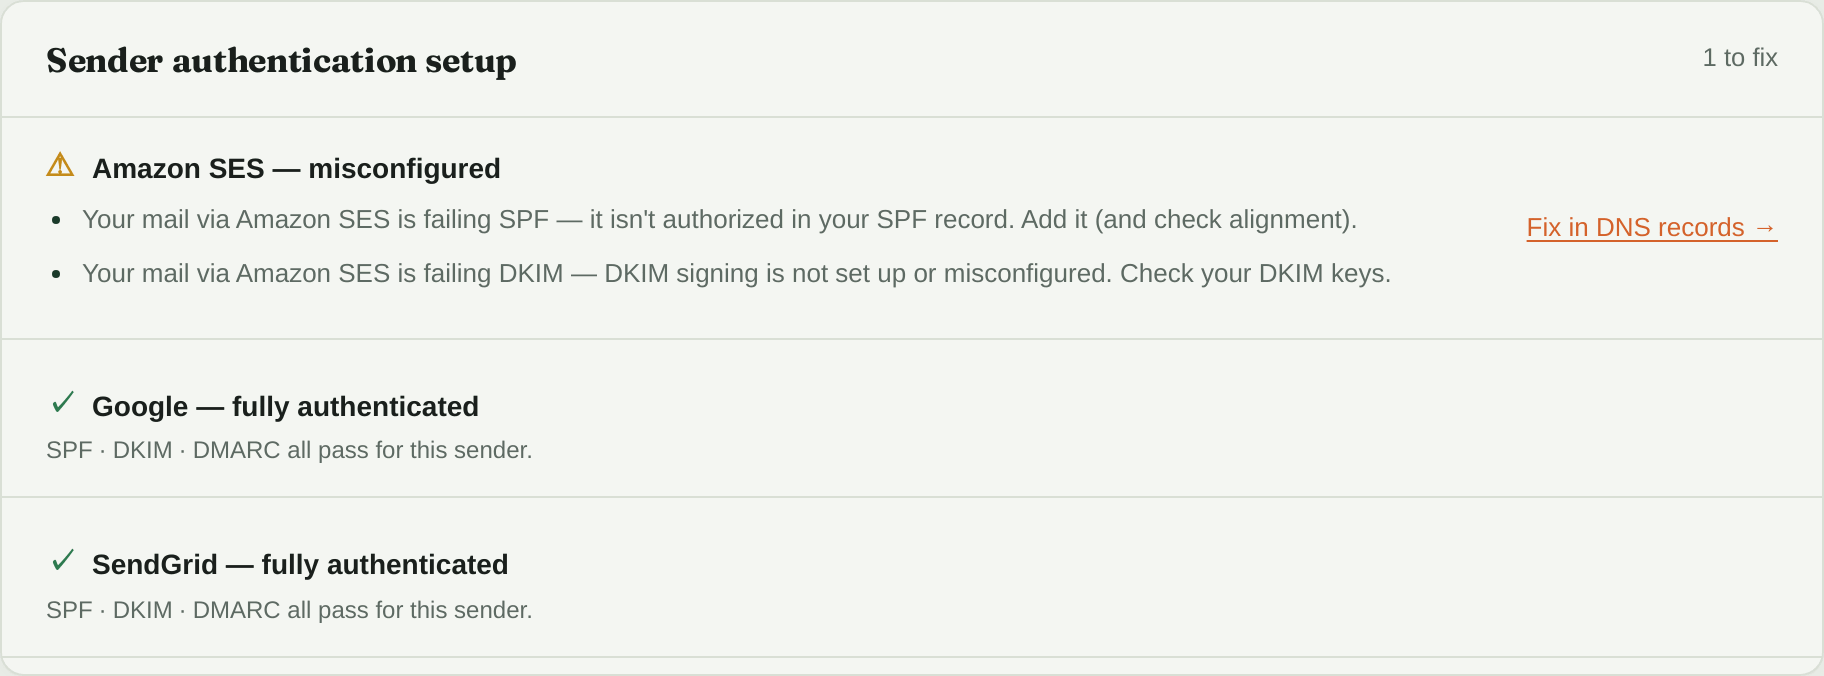
This is the switch gone wrong: your other tools still pass, but the new provider (here Amazon SES) is sending your mail with neither SPF nor DKIM set up for it. You see it named, instead of guessing from a customer’s spam-folder screenshot.
Step 4: Leave your DMARC policy alone while you switch
DMARC lives at _dmarc.example.com. If you’re setting it up for the first time, a safe starting record is:
v=DMARC1; p=none; rua=mailto:your-report-address@example.comIn plain English: “collect reports, but don’t block anything yet.” The standard defines p=none as the Domain Owner offering no preference either way, which is exactly why it’s safe to sit on during a migration.
If your domain already enforces p=quarantine or p=reject, don’t loosen it to make the migration easier, and don’t touch it at all while you’re mid-switch. Stage the DNS changes, test, and only tighten or adjust policy once you have evidence the new provider passes.
If DMARC Guardian manages your report address, use the rua value from your domain’s DNS setup screen, not the placeholder above.
Step 5: Send real test emails, not just one “hello”
Test the messages that make or lose money:
- new signup confirmation
- login link, if your app uses one
- password reset
- invoice or receipt
- failed payment notice
- support reply
Send each to a Gmail address and, if you have one, a Microsoft address. Open the received message and check the details or raw headers (“Show original” in Gmail). You want:
spf=pass
dkim=pass
dmarc=pass
You’re not checking that the email looks nice. You’re checking that the inbox trusts it.
Step 6: Watch your reports for the next few days
One successful test proves one path works. It doesn’t prove every background email does.
DMARC reports show which services are sending from your domain and whether they’re passing. They arrive on their own schedule, not instantly, so give it a few days rather than checking once and moving on. If reports go quiet entirely instead of showing new data, that’s its own problem: see what it means when DMARC reports stop arriving. Otherwise, watch for:
- the new provider failing SPF or DKIM
- email still coming from the old provider
- a source you don’t recognize sending as your domain
When can you remove the old provider from DNS?
Once all three are true:
- The old provider’s API key or SMTP login is no longer active anywhere in your app.
- Reports show no legitimate mail from the old provider for several days.
- Your important flows (signup, reset, invoices, support) pass DMARC through the new provider with an aligned SPF or DKIM result.
Then remove the old SPF include:. Old DKIM records can wait a little longer if you’re not fully sure. They’re not the urgent cleanup item.
The quick checklist
Before switching:
- List every app, billing tool, support tool, and automation that sends email.
- Save a copy of your current SPF, DKIM, and DMARC records.
- Add the new provider to the existing SPF record, don’t create a second one.
- Add the new DKIM records exactly as shown.
- Leave your current DMARC policy alone during the switch.
After switching:
- Test signup, password reset, invoices, and support replies.
- Check raw headers for
dmarc=passwith an aligned SPF or DKIM result. - Watch reports for a few days; investigate if the data you expect doesn’t show up.
- Remove the old SPF
include:only after old-provider traffic disappears.
The boring DNS work protects real revenue
For a small SaaS, one missing password reset isn’t just an email glitch. It’s a failed onboarding, an unpaid invoice, or a customer who quietly stops trusting the product. Take the extra thirty minutes: add the new records without deleting the old ones, test the flows that matter, and watch the reports before you tighten anything.